The goal is to implement a proxy server for HTTP and HTTPS. Handling of HTTP is a matter of parsing request, passing such request to destination server, reading response and passing it back to the client. All we need for that is built-in HTTP server and client (net/http). HTTPS is different as it’ll use technique called HTTP CONNECT tunneling. First client sends request using HTTP CONNECT method to set up the tunnel between the client and destination server. When such tunnel consisting of two TCP connections is ready, client starts regular TLS handshake with destination server to establish secure connection and later send requests and receive responses.
Certificates
Our proxy will be an HTTPS server (when
—-proto https will be used) so we need certificate and private key. For the purpose of this post let’s use self-signed certificate. To generate one use such script:#!/usr/bin/env bash
case `uname -s` in
    Linux*)     sslConfig=/etc/ssl/openssl.cnf;;
    Darwin*)    sslConfig=/System/Library/OpenSSL/openssl.cnf;;
esac
openssl req \
    -newkey rsa:2048 \
    -x509 \
    -nodes \
    -keyout server.key \
    -new \
    -out server.pem \
    -subj /CN=localhost \
    -reqexts SAN \
    -extensions SAN \
    -config <(cat $sslConfig \
<(printf '[SAN]\nsubjectAltName=DNS:localhost')) \
    -sha256 \
    -days 3650
It’s required to convince your OS to trust such certificate. In OS X it can be done with Keychain Access — https://tosbourn.com/getting-os-x-to-trust-self-signed-ssl-certificates/.
HTTP
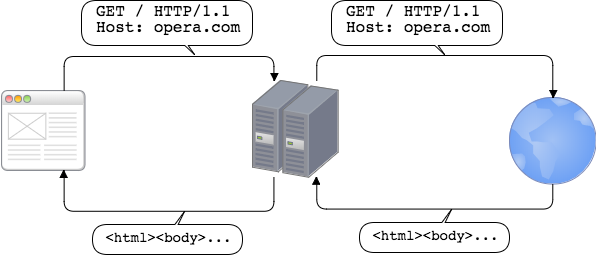
To support HTTP we’ll use built-in HTTP server and client. The role of proxy is to handle HTTP request, pass such request to destination server and send response back to the client.
HTTP CONNECT tunneling
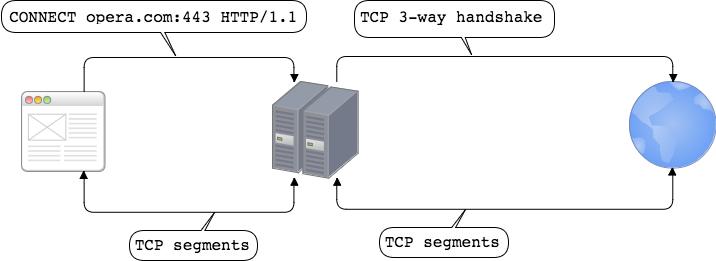
Suppose client wants to use either HTTPS or WebSockets in order to talk to server. Client is aware of using proxy. Simple HTTP request / response flow cannot be used since client needs to e.g. establish secure connection with server (HTTPS) or wants to use other protocol over TCP connection (WebSockets). Technique which works is to use HTTP CONNECT method. It tells the proxy server to establish TCP connection with destination server and when done to proxy the TCP stream to and from the client. This way proxy server won’t terminate SSL but will simply pass data between client and destination server so these two parties can establish secure connection.
Implementation:
package mainimport (
"crypto/tls"
"flag"
"io"
"log"
"net"
"net/http"
"time"
)func handleTunneling(w http.ResponseWriter, r *http.Request) {
dest_conn, err := net.DialTimeout("tcp", r.Host, 10*time.Second)
if err != nil {
http.Error(w, err.Error(), http.StatusServiceUnavailable)
return
}
w.WriteHeader(http.StatusOK)
hijacker, ok := w.(http.Hijacker)
if !ok {
http.Error(w, "Hijacking not supported", http.StatusInternalServerError)
return
}
client_conn, _, err := hijacker.Hijack()
if err != nil {
http.Error(w, err.Error(), http.StatusServiceUnavailable)
}
go transfer(dest_conn, client_conn)
go transfer(client_conn, dest_conn)
}
func transfer(destination io.WriteCloser, source io.ReadCloser) {
defer destination.Close()
    defer source.Close()
    io.Copy(destination, source)
}
func handleHTTP(w http.ResponseWriter, req *http.Request) {
    resp, err := http.DefaultTransport.RoundTrip(req)
    if err != nil {
        http.Error(w, err.Error(), http.StatusServiceUnavailable)
        return
    }
    defer resp.Body.Close()
    copyHeader(w.Header(), resp.Header)
    w.WriteHeader(resp.StatusCode)
    io.Copy(w, resp.Body)
}
func copyHeader(dst, src http.Header) {
for k, vv := range src {
for _, v := range vv {
dst.Add(k, v)
}
}
}func main() {
var pemPath string
flag.StringVar(&pemPath, "pem", "server.pem", "path to pem file")
var keyPath string
flag.StringVar(&keyPath, "key", "server.key", "path to key file")
var proto string
flag.StringVar(&proto, "proto", "https", "Proxy protocol (http or https)")
flag.Parse()
    if proto != "http"&& proto != "https" {
        log.Fatal("Protocol must be either http or https")
    }
server := &http.Server{
Addr: ":2288",
Handler: http.HandlerFunc(func(w http.ResponseWriter, r *http.Request) {
if r.Method == http.MethodConnect {
handleTunneling(w, r)
} else {
handleHTTP(w, r)
}
}),
// Disable HTTP/2.
TLSNextProto: make(map[string]func(*http.Server, *tls.Conn, http.Handler)),
}
    if proto == "http" {
        log.Fatal(server.ListenAndServe())
    } else {
        log.Fatal(server.ListenAndServeTLS(pemPath, keyPath))
    }
}
The above Presented code is not a production-grade solution. It lacks e.g. handling hop-by-hop headers, setting up timeouts while copying data between two connections or the ones exposed by net/http — more on this in “The complete guide to Go net/http timeouts”.
Our server while getting request will take one of two paths: handling HTTP or handling HTTP CONNECT tunneling. This is done with:
http.HandlerFunc(func(w http.ResponseWriter, r *http.Request) {
    if r.Method == http.MethodConnect {
        handleTunneling(w, r)
    } else {
        handleHTTP(w, r)
    }
})
Function to handle HTTP — handleHTTP is self-explanatory so let’s focus on handling tunneling. The first part of handleTunneling is about setting connection to destination server:
dest_conn, err := net.DialTimeout("tcp", r.Host, 10*time.Second)
if err != nil {
    http.Error(w, err.Error(), http.StatusServiceUnavailable)
    return
 }
 w.WriteHeader(http.StatusOK)
Next we’ve a part to hijack connection maintained by HTTP server:
hijacker, ok := w.(http.Hijacker)
    if !ok {
        http.Error(w, "Hijacking not supported", http.StatusInternalServerError)
        return
    }
    client_conn, _, err := hijacker.Hijack()
    if err != nil {
        http.Error(w, err.Error(), http.StatusServiceUnavailable)
    }
Hijacker interface allows to take over the connection. After that the caller is responsible to manage such connection (HTTP library won’t do it anymore).
Once we’ve two TCP connections (client→proxy, proxy→destination server) we need to set tunnel up:
go transfer(dest_conn, client_conn)
go transfer(client_conn, dest_conn)
In two goroutines data is copied in two directions: from the client to the destination server and backward.
Testing
To test our proxy you can use e.g. Chrome in windows:
chrome.exe --proxy-server=https://vps-ip:2288
from https://medium.com/@mlowicki/http-s-proxy-in-golang-in-less-than-100-lines-of-code-6a51c2f2c38c
-----------
我的补充说明
测试可行。登陆linux vps.先安装go环境。然后,
openssl req -x509 -nodes -days 3650 -newkey rsa:2048 -keyout server.key -out server.pem
会在当前目录/root下面生成server.key和server.pem文件。
然后新建文件https-proxy.go ,把上面的橘红色代码复制粘贴到https-proxy.go文件中,里面我已把端口改为了2288,
把"path to pem file"和 "path to key file"分别改为 "/root/server.pem"和 "/root/server.key"然后运行:go build https-proxy.go
此命令会在当前目录下生成可执行文件https-proxy,
./https-proxy &
不过命令:./https-proxy &容易退出运行,我们可利用systemd把该命令运行为service:
nano /etc/systemd/system/https-proxy-in-go.service
内容为:
[Unit]

After=network.target

[Service]

WorkingDirectory=/root/

ExecStart=/root/https-proxy

Restart=always

[Install]

WantedBy=multi-user.target
然后运行:
systemctl start https-proxy-in-go

systemctl enable https-proxy-in-go

服务器端搭建完成。


在本地机器mac上。

运行命令:

open "/applications/vivaldi.app/" --args --proxy-server=https://vps-ip:2288 --ignore-certificate-errors

就会启动基于chrome内核的浏览器vivaldi,然后在浏览器vivaldi里面,即可翻墙。


你可把命令:open "/applications/vivaldi.app/" --args --proxy-server=https://vps-ip:2288 --ignore-certificate-errors

保存为start.sh ,然后chmod 755 start.sh ,以后运行./start.sh ,即可启动浏览器vivaldi,进行翻墙。