Quantcast
Channel: 看得透又看得远者prevail.ppt.cc/flUmLx ppt.cc/fqtgqx ppt.cc/fZsXUx ppt.cc/fhWnZx ppt.cc/fnrkVx ppt.cc/f2CBVx
Viewing all 20492 articles
Browse latest View live

soWatch-mk2

$
0
0
This add-on intends to improve user experience of Chinese video sites. It also has a high risk of violating the local law of China. Use at your own risk! 
##Manual (用户手册)
###How to Use###使用说明

from https://github.com/jinagko/soWatch-mk2

Minify

$
0
0
Combines. minifies, and serves CSS or Javascript files.
Minify is an HTTP server for JS and CSS files. It compresses and combines files and serves it with appropriate headers, allowing conditional GET or long-Expires.
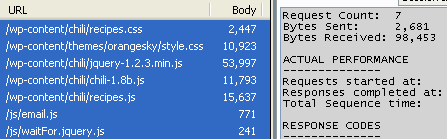
Before7 requests
After2 requests
The stats above are from a brief walkthrough which shows how easy it is to set up Minify on an existing site. It eliminated 5 HTTP requests and reduced JS/CSS bandwidth by 70%.
Relative URLs in CSS files are rewritten to compensate for being served from a different directory.

Static file serving

Version 3 allows serving files directly from the filesystem for much better performance. We encourage you to try this feature.

Support

Post to the Google Group.

Installation

See the install guide.

Configuration & Usage

(Using 2.x? Here are the 2.x docs.)
See the user guide.
Minify also comes with a URI Builder application that can help you write URLs for use with Minify or configure groups of files.
See the cookbook for more advanced options for minification.
More docs are available.

Unit Testing

  1. Install dev deps via Composer: composer install
  2. composer test or phpunit

Warnings

  • Minify is designed for efficiency, but, for very high traffic sites, it will probably serve files slower than your HTTPd due to the CGI overhead of PHP. See the FAQ and CookBook for more info.
  • If you combine a lot of CSS, watch out for IE's 4096 selectors-per-file limit, affects IE 6 through 9.
  • Minify should work fine with files encoded in UTF-8 or other 8-bit encodings like ISO 8859/Windows-1252. By default Minify appends ";charset=utf-8" to the Content-Type headers it sends.

Acknowledgments

Minify was inspired by jscsscomp by Maxim Martynyuk and by the article Supercharged JavaScript by Patrick Hunlock.
The JSMin library used for JavaScript minification was originally written by Douglas Crockford and was ported to PHP by Ryan Grove specifically for use in Minify.

from https://github.com/mrclay/minify

网易云音乐API

$
0
0
网易云音乐 Node.js API service

VersionLicensedevDependenciesdevDependencies

灵感来自

disoul/electron-cloud-music
darknessomi/musicbox
sqaiyan/netmusic-node

功能特性

  1. 登录
  2. 刷新登录
  3. 发送验证码
  4. 校验验证码
  5. 注册(修改密码)
  6. 获取用户信息 , 歌单,收藏,mv, dj 数量
  7. 获取用户歌单
  8. 获取用户电台
  9. 获取用户关注列表

环境要求

需要 NodeJS 8.12+ 环境.

安装

$ git clone git@github.com:Binaryify/NeteaseCloudMusicApi.git
$ npm install

运行

$ node app.js
服务器启动默认端口为 3000,若不想使用 3000 端口,可使用以下命令: Mac/Linux
$ PORT=4000 node app.js
windows 下使用 git-bash 或者 cmder 等终端执行以下命令:
$ set PORT=4000 && node app.js

使用文档

文档地址
文档

from https://github.com/Binaryify/NeteaseCloudMusicApi

ShanaEncoder

91Porn Android 客户端-v9porn

$
0
0
91Porn Android 客户端,突破游客每天观看10次视频的限制,还可以下载视频。

目前具备功能

  1. 无限制观看(绝大部分用户)
  2. 登录收藏功能
  3. 下载视频
  4. 额外的图片板块以及其他视频板块
  5. 浏览论坛帖子功能

技术概览

rxjava + retrofit + rxcache + mvp + jsoup + dagger2
时间能力有限,欢迎各位提交PR

from https://github.com/techGay/v9porn

基于php+mysql的博客程序-yaf

$
0
0
由最快的PHP框架-Yaf打造的:快如闪电的博客系统.

本项目适合新手学习Yaf框架。

项目架构

  • Linux+Nginx+PHP+MySQL+Redis
  • 涉及的插件、扩展

  • 代码高亮插件--Prism
  • 为Prism改造Ueditor
  • ajaxform
  • 全站搜索Sphinx-coreseek
  • PHP框架--Yaf
  • 为什么要写这个项目?

    起先,我的博客放在CSDN上,那里面技术博客众多,可是后来感觉CSDN的服务器太卡,有时候打开一个博客要半分钟。 简直不能忍啊。于是改投博客园,博客园服务器还算稳定,但是在博客园上写博客,感觉他后台的功能用着不顺手,比较反人类,遂决定自己搭一个博客系统。
    为什么不用WordPress?
    太卡(里面很多地方调google的文件,要 一 一 替换掉,不然卡死你),然后太大太臃肿,很多功能我都用不到,这不符合我喜欢DIY的性格。
    为什么选择Yaf框架?
    到底是用最近火热的Laravel或者Symfony,亦或是鸟哥的Yaf,还是用我最熟悉的CodeIgniter,前三者都有学习成本,最后想了想,这次追求的是快,那就用最快的PHP框架-----Yaf,来搭建一个更快的Blog系统。
    开始用Yaf以后,才发现,它就是我要的那个框架!他不喜欢慢!他快如闪电。他没有臃肿的类库与功能,他简约而不简单。Yaf,简直就是为本博客量身打造的。更多Yaf优点详见请点击。

    第一次学习Yaf框架,很多功能都是摸索着来的,所以此项目必有纰漏。 第一次用Github提交(之前都是浏览别人的项目),所以Github的功能也是摸索着来的。

    项目特色

    快如闪电和安全。
    Yaf和Redis,为我们提供了快如闪电的访问体验,我前台也是能少加载文件,就少加载文件,能用CDN(比如jquery),就用CDN
    用户add的地方有两处,发表评论和添加友链,都做了防XSS和防SQL注入。 全站搜索,用了sphinx也进一步加快了速度,并确保了防止sql注入。 评论做了基于Redis的IP时间限制,每60秒同一个IP的用户只能说两句话。 管理员登陆入口隐藏,并对登陆接口做了基于Redis的IP错误次数限制。每10分钟错3次禁止此IP登陆。

    快速开始

    1.请确保你的机器已经安装了PHP、Nginx、Mysql、Redis、Coreseek
    2.导入sql文件blog.sql,替换Coreseek的配置文件csft.conf并修改数据库配置,替换虚拟主机文件vhost.conf并修改配置,
    3.重启webserver
    4.后台登陆地址为【点击首页顶部的白色猫头,会弹出登录窗口,默认登陆密码123456】
    5.TODO 新加入安装模块:初次进入项目,会直接跳转到安装模块,自动化建表,并给博客管理员注册账号
    目录结构
    - index.php             //入口文件 定义常量BASE_URL
    - favicon.ico
    + public //公共静态资源
    |- css
    |- images
    |- js
    |- ueditor
    + conf
    |- application.ini //配置文件
    + application
    |+ controllers
    |- Index.php //默认控制器
    |- Blog.php
    |- Blogtype.php
    |- Cat.php //综合信息控制器
    |- Comment.php
    |- Error.php //错误处理控制器
    |- Admin.php //后台控制器
    |- Link.php
    |- Say.php
    |- Tag.php
    |- Test.php //测试专用控制器
    |+ views
    |+ index
    ......
    |+ test
    |+ public
    |- 404.php
    |- foot.php
    |- head.php
    |- right.php
    |+ models
    .......
    |- Search.php //搜索引擎类
    |+ library
    |- Db.php //数据库类 我网上找的然后改造的mysqli
    |- Function.php //方法类,里面继承了一些可以全局调用的方法
    |- Imagecompress.php //图片压缩类 压缩说说里上传的图片
    |- Rdb.php //Redis类
    |- Bootstrap.php //项目的全局启动文件,里面启动了redis mysql 加载方法类
    - csft.conf //Sphinx-coreseek配置文件
    - vhost.conf //nginx虚拟主机配置文件
    - blog.sql //数据库文件
     
    from https://github.com/suliang/Yaf-Blog 

    Modern Web Programing

    $
    0
    0


    As we know, web is very popular nowadays. It is related to our life in all respects such as solving the problems, shopping, sending emails and so on. In order to catch its steps, I begin to learn web knowledge through the web-class in SYSU. Here are some web projects achieved by myself. I will be very pleasure to hear from you to guide me to a better place.
    from  https://github.com/linwh8/ModernWebPrograming

    91porn视频解析工具

    $
    0
    0

    91_porn_video_url注意事项

    仅支持python3

    python所需库安装:

    pip3 install requests

    使用方法(示例):

    python3 91_mp4_url.py http://91porn.com/view_video.php?viewkey=9bae6a513ae379a52aa5
     
    from https://github.com/eqblog/91_porn_video_url 
     
    相关帖子:https://briteming.blogspot.com/2018/10/ojbk.html 
     

    一键部署v2ray到heroku空间

    $
    0
    0
    Deploy V2Ray to Heroku.

    Deploy


    1.部署时配置 v2ray core 的版本、Vmess协议的UUID、AlterId、Path和连接缓存。
    2.如果输入AppName变量,则自动生成订阅地址和二维码,通过配置V2_QR_Path变量修改地址 二维码地址:https://test.herokuapp.com/1234/v2.png订阅地址:https://test.herokuapp.com/1234 (test改成自己的app名称,如果更改了V2_QR_Path,同时也要将对应的1234改成修改后的)
    3.服务端部署后,点 open app ,能正常显示网页,地址补上path后访问显示 Bad Request,表示部署成功。
    4.更新 v2ray 版本,访问 https://dashboard.heroku.com/apps选择部署好v2ray的app,如果VER变量为 latest。直接选择More --> Restart all dynos, 程序自动重启,可通过view Logs确认进度。(更新指定版本: Settings --> Reveal Config Varsapp -->VER,修改成需要的版本号,例如 3.21)

    参考

    https://github.com/wangyi2005/v2ray-heroku
    https://github.com/1715173329/v2ray-heroku-undone

    from https://github.com/xiangrui120/v2ray-heroku-undone

    Wechat Robot

    $
    0
    0


    微信自动回复机器人可以:

    实现以下功能(接入图灵机器人):

    1.微信好友自动回复
    2.普通群里@回复,特定群自动回复
    3.整点报时功能
    4.远程管理员开启/关闭机器人
    5.自动添加好友
    6.发送关键字自动邀请进群
    7.远程管理员移出群成员(机器人为群主)
    8.远程管理员控制机器人退出微信
    9.管理员和接受消息的群,退出时保存到txt文档中。下次登录时读取,避免数据流失。
    10.增加更多新功能,并提供用户使用手册和管理员使用手册。

    from  https://github.com/Huomen/wechat-robot

    Dustin Hoffman主演的电影-The Graduate(毕业生)

    利用dragonite-proxy翻墙

    netfilter-spooftcp

    $
    0
    0
    A lightweight kernel module/iptables extension for sending spoofed TCP packets.
    This is a kernel-space, partial implementation of this paper

    Build

    Prerequisites:
    • kernel headers
    • xtables headers

    Kernel Module

    $ make
    # insmod xt_SPOOFTCP.ko

    iptables Extension

    Copy libxt_SPOOFTCP.so to iptables library folder, say /lib/xtables.
    Run iptables -j SPOOFTCP --help and see if it prints the help message of this module.

    Usage

    ip6tables -t mangle -A POSTROUTING -d 2001:db8::/64 -p tcp --dport 80 --syn -j SPOOFTCP --tcp-flags SYN,ACK
    This will sent a spoofed SYN,ACK packet prior to the matched (original) SYN packet.
    There are mechanisms to prevent the spoofed packets from being tracked by nf_conntrack or being matched by another SPOOFTCP rule.

    Known issue

    Incompatible with SNAT because the spoofed packets bypass nf_conntrack.
    Use either one of the workarounds below:
    1. Use --masq parameter. It re-implements MASQUERADE statelessly, but it won't work in case of port changes or custom SNAT rules.
    2. Patch the kernel to add a chain in raw table. The chain is hooked after SNAT. Tested on kernel 4.14 and 4.19
    from https://github.com/LGA1150/netfilter-spooftcp
    ----

    A kernel module to turn MASQUERADE into full cone SNAT.
    Implementation of RFC3489-compatible full cone SNAT.
    Assuming eth0 is external interface:
    iptables -t nat -A POSTROUTING -o eth0 -j FULLCONENAT #same as MASQUERADE  
    iptables -t nat -A PREROUTING -i eth0 -j FULLCONENAT #automatically restore NAT for inbound packets
    Currently only UDP traffic is supported for full-cone NAT. For other protos FULLCONENAT is equivalent to MASQUERADE.

    Build

    Prerequisites:
    • kernel source
    • iptables source ( git://git.netfilter.org/iptables.git )
    Confirm the kernel configuration option CONFIG_NF_CONNTRACK_EVENTS is enabled. If this option is disabled on your system, enable it and rebuild your netfilter modules.

    Kernel Module

    $ make
    # insmod xt_FULLCONENAT.ko

    Iptables Extension

    1. Copy libipt_FULLCONENAT.c to iptables-source/extensions.
    2. Under the iptables source directory, ./configure(use --prefix to replace your current iptables by looking at which iptables), make and make install

    OpenWRT

    Package for openwrt is available at https://github.com/LGA1150/openwrt-fullconenat

    Usage

    Assuming eth0 is external interface:
    Basic Usage:
    iptables -t nat -A POSTROUTING -o eth0 -j FULLCONENAT
    iptables -t nat -A PREROUTING -i eth0 -j FULLCONENAT
    Random port range:
    iptables -t nat -A POSTROUTING -o eth0 ! -p udp -j MASQUERADE
    iptables -t nat -A POSTROUTING -o eth0 -p udp -j FULLCONENAT --to-ports 40000-60000 --random-fully

    iptables -t nat -A PREROUTING -i eth0 -p udp -m multiport --dports 40000:60000 -j FULLCONENAT
    Hairpin NAT (Assuming eth1 is LAN interface and IP range for LAN is 192.168.100.0/24):
    iptables -t nat -A POSTROUTING -o eth0 -j FULLCONENAT
    iptables -t nat -A POSTROUTING -o eth1 -s 192.168.100.0/24 -j MASQUERADE
    iptables -t nat -A PREROUTING -i eth0 -j FULLCONENAT
    iptables -t nat -A PREROUTING -i eth1 -j FULLCONENAT

    kernel Patch (Optional.)

    1. Copy xt_FULLCONENAT.c to kernel-source/net/netfilter/xt_FULLCONENAT.c
    2. Append following line to kernel-source/net/netfilter/Makefile:
    obj-$(CONFIG_NETFILTER_XT_TARGET_FULLCONENAT) += xt_FULLCONENAT.o
    1. Insert following section into kernel-source/net/ipv4/netfilter/Kconfig right after config IP_NF_TARGET_NETMAP section:
    config IP_NF_TARGET_FULLCONENAT
    tristate "FULLCONENAT target support"
    depends on NETFILTER_ADVANCED
    select NETFILTER_XT_TARGET_FULLCONENAT
    ---help---
    This is a backwards-compat option for the user's convenience
    (e.g. when running oldconfig). It selects
    CONFIG_NETFILTER_XT_TARGET_FULLCONENAT.

    1. Insert following section into kernel-source/net/netfilter/Kconfig right after config NETFILTER_XT_TARGET_NETMAP section:
    config NETFILTER_XT_TARGET_FULLCONENAT
    tristate '"FULLCONENAT" target support'
    depends on NF_NAT
    ---help---
    Full Cone NAT

    To compile it as a module, choose M here. If unsure, say N.

    1. Run make menuconfig and select: Networking support -> Network options -> Network packet filtering framework (Netfilter) -> IP: Netfilter Configuration -> FULLCONENAT target support
    from https://github.com/Chion82/netfilter-full-cone-nat


    中国特色

    $
    0
    0
    没有哪个国家的程序开发者像我们一样热衷于网络拥塞的解决,数据加密传输,以及各种代理技术的开发。

     哈,这是中国特色,实在是被逼无奈。

    利用shadowsocks-libev解決DNS污染问题

    $
    0
    0
    shadowsocks-libev从2.5.1 版本开始,正式支持了 access control list (ACL) 功能,在 3.0.6 版本 ss-local 的內置分流功能在這個 commit之後就如常工作了,這裡是一些使用例子。ACL 功能使得 shadowsocks-libev 能對接受的請求按照一定的規則進行直連或代理。內置分流是如何實現的呢?實際上,shadowsocks-libev 還內置了一個異步 DNS client,並允許用戶將系統的 SOCKS5 代理設置為 shadowsocks-libev。這樣,shadowsocks-libev 便幾乎全局接管了系統流量,當 shadowsocks-libev 接收到一個域名時候,首先會對 ACL 列表中的條目進行正則匹配,如果沒有結果,則利用自帶的 DNS client 進行解析,得到 IP 之後再次匹配。就這樣,shadowsocks-libev 把本來在瀏覽器解析 PAC 的功能移動到 shadowsocks-libev 內部,解決了 PAC 分流在不同應用間行為不一致的問題。更重要的是,當域名解析為 IP,並且根據 ACL 規則觸發代理時,shadowsocks-libev 會將域名,而不是 IP 交給 ss-server,就這樣優雅地解決了DNS污染和CDN解析不是最優的問題。

    分流代理在內建 DNS Client這件事上,shadowsocks-libev 並不是唯一一個,V2Ray 和 Surge 還有 Clash均是內建了 DNS Client。特別是 Clash 支持部署在 Linux 系統,利用系統的 Netfilter 功能實現對 OUTPUT 鏈和 NAT 鏈上的 TCP 包進行代理,讓我們在 OpenWrt 路由器,部署代理又多了一種新選擇。

    shadowsocks-libev版有一个ss-tunnel工具,可以把远端主机(比如8.8.8.8)的端口(比如53)转发到本地的端口(比如53)。如果把8.8.8.8的53端口转发到本地的53端口,那么相当于开通了一个走shadowsocks-libev协议的DNS代理
    在mac上,安装 shadowsocks-libev:brew install shadowsocks-libev
    此命令会生成2个可执行文件:ss-local和ss-tunnel.
    运行ss-tunnel -h
    会显示:
    ...
     [-u]                       Enable UDP relay.
    ...
     [-L :]         Destination server address and port
                                      for local port forwarding.


     所以,运行的命令就是:
    sudo ss-tunnel -s vps-ip -p 服务器上的shadowsocks-libev的端口号 -k my-key -m aes-256-cfb -l 53 -L 8.8.8.8:53 -u 

    上面这条命令就相当于一个dns proxy,是一个走shadowsocks-libev通道的dns proxy.妈妈说:你再也不用怕dns污染了。我觉得此法是解決DNS污染问题的终极大法。

    实际使用例子:
    sudo networksetup -setdnsservers "Wi-Fi" 127.0.0.1
     
    sudo wg-quick up wg0

    sudo networksetup -setdnsservers "Wi-Fi" 127.0.0.1


    sudo ss-tunnel -s vps-ip -p 服务器上的shadowsocks-libev的端口号 -k my-key -m aes-256-cfb -l 53 -L 8.8.8.8:53 -u  


    然后,你就可使用wireguard vpn任意翻墙了。

    利用ss的obfs混淆功能,达到无限使用流量的目的

    $
    0
    0
    之前,流量不是无限的时代, 因为只有运营商的 APP 可以无限使用流量, 比如什么天翼视讯, 利用ss的obfs混淆功能, 可以将你的手机流量伪装为天翼视讯的流量, 从而达到无限使用流量的目的, 这种操作太骚, 实测可以成功, 不过还是低调的好.

    xfrp和xfrps

    $
    0
    0
    frp client for openwrt&LEDE.

    What is xfrp and why start xfrp

    xfrp is xfrps client implemented by c for OpenWRT and LEDE system
    The motivation to start xfrp project is that we are OpenWRTer, and openwrt usually ran in device which has little ROM and RAM space, however golang always need more space and memory; therefore we start xfrp project.

    Compile

    xfrp need libeventopenssl-dev and json-c support
    Before compile xfrp, please install libeventopenssl-dev and json-c in your system.
    git clone https://github.com/KunTengRom/xfrp.git
    cd xfrp
    cmake .
    make

    Quick start

    before using xfrp, you should have built the proxy server: xfrps, It's no difference with frp at usage, but support FTP and more embedded-client-friendly for linux.
    Run in debug mode :
    xfrpc -c frpc_mini.ini -f -d 7 
    Run in release mode :
    xfrpc -c frpc_mini.ini -d 0

    FTP support

    xfrp support ftp proxy after version 0.07.451. Hypothesize you have built xfrps succeed!
    Configure ftp in frpc.ini
    [common]
    server_addr = 111.112.113.114
    server_port = 7001

    [router_ftp_example]
    type = ftp
    local_port = 21
    remote_port = 30621
    remote_data_port = 30622
    remote_port is the reporxy port of FTP command tunnel, and remote_data_port is FTP-DATA port reporxy.
    Use -p (PASV Mode) of ftp command to connect to proxy ftp server:
    ftp -p 111.112.113.114 30621
    In Master version server_addr can use domain name intead of IP address in FTP proxy. Issue #4 and Issue #5.

    from https://github.com/KunTengRom/xfrp
    ------

    xfrps forks from https://github.com/fatedier/frp
    but mainly use its server side feature and cooperate with xfrp.

    What is xfrps and why xfrps

    xfrps was xfrp's server, it was a branch of frp which mainly focus on serving amount of routers and IOT devices
    The reason to start xfrps project is the following:
    1, we need a stable frp server to serve our xfrp, however frp change very fast, high version of frp doesn't promise compatible with low version
    2, frp's roadmap doesn't satisfy xfrp's need, for example, ftp support is important for us, but frp didn't support it
    3, by maintaining our own frp server project, we can develope our own feature, no need to wait frp's support

    Difference between xfrps and frp

    xfrps start from v0.11.0 of frp, the following is difference:

    xfrps need client provide runid, if not, it will reject it.

    xfrps support only one tcp&ftp proxy for every client, and xfrps'client don't need to provide its remote port, xfrps will choose one for it

    client can use its runid to get its tcp&ftp proxy's remote port by http request
    for example curl http://xfrps_domains:7500/api/port/tcp/getport/your_runid

    xfrps support ftp

    in order to use ftp proxy, u need add the following content to config file
    type = ftp
    local_ip = your ftp server ip
    local_port = 21
    to get ftp remote port, using the following http request:
    curl http://xfrps_domains:7500/api/port/tcp/getftpport/your_runid

    from https://github.com/KunTengRom/xfrps
    ------

    相关帖子:https://briteming.blogspot.com/2017/05/frp.html


    这世界与我,是那么的配!

    $
    0
    0
    世界有这么个人,离你很远,却抚摸着你的精神,给你愉悦,给你生活的热情。
    世界上会有这么个东西,它无处不在、无所不能,给你力量,让你无所畏惧。

    深吸一口,别管别人,来喊一声:这世界与我,是那么的配!

    把Openshift空间用作ssh server

    $
    0
    0
    1. 首先注册帐号,
    2. 然后安装OpenShift Client tools 简称rhc , lz是centos 7.2, 官方步骤
      1
      sudogem installrhc
    3. 然后开始配置,按提示一步一步完成
      1
      2
      3
      4
      5
      6
      7
      $ rhc setup
      OpenShift Client Tools (RHC) Setup Wizard
       
      This wizard will help you upload your SSH keys, setyour application namespace, and check that other programs like Git are properly installed.
       
      If you have your own OpenShift server, you can specify it now. Just hit enter to use the server forOpenShift Online: openshift.redhat.com.
      Enter the server hostname: |openshift.redhat.com|
      之后就可以拿ssh登陆了,但是有段时间不用的话就会
      1
      This gear has been temporarily unidled. To keep it active, access your app @ http://python-xxx.rhcloud.com/
      如果能连上,说明配置正确,只要在本机这样就行了:
      1
       ssh-D 7080 your-username@python-xxx.rhcloud.com
      然后你在firefox里,设置socks5代理为127.0.0.1,端口7080,ff就可以翻墙了。

      ps: openshift/heroku上可以装 shadowsocks-heroku

      参考:
      Openshift – Remote Connection (SSH)

    linux commands

    $
    0
    0
    如果不会敲命令,有一些自动生成命令的网站,如:
    http://bashrcgenerator.com
        同类网站:
        http://ezprompt.net/
        https://www.kirsle.net/wizards/ps1.html

        命令太长看不懂怎么办,有自动解析网站:
        http://explainshell.com/
        https://www.shellcheck.net/

        任何操作都想一行命令搞定怎么办,有命令行大全网站可以搜来改:
        http://www.commandlinefu.com/commands/browse
    Viewing all 20492 articles
    Browse latest View live